

This Flaky Paleo Apple Pie is a gluten-free variation on a classic dessert. Sweet cinnamon-scented apples are tucked beneath a buttery, tender, flaky crust. It’s everything you love about traditional apple pie, made with wholesome ingredients. A family favorite for the holidays.
Making apple pie always fills me with warm memories of baking with my mother during the holidays. I remember the sweet cinnamon aroma filling the kitchen, the fun of being together peeling apples, rolling pie dough, and laughing. This updated, healthier version keeps all the delicious tradition and cozy holiday magic—just made with wholesome ingredients and every bit as wonderful as the original.
In this recipe I lightly pre-cook the filling on the stove for about 5 minutes before assembling to get the juiciest apple flavor and perfect tender texture,.
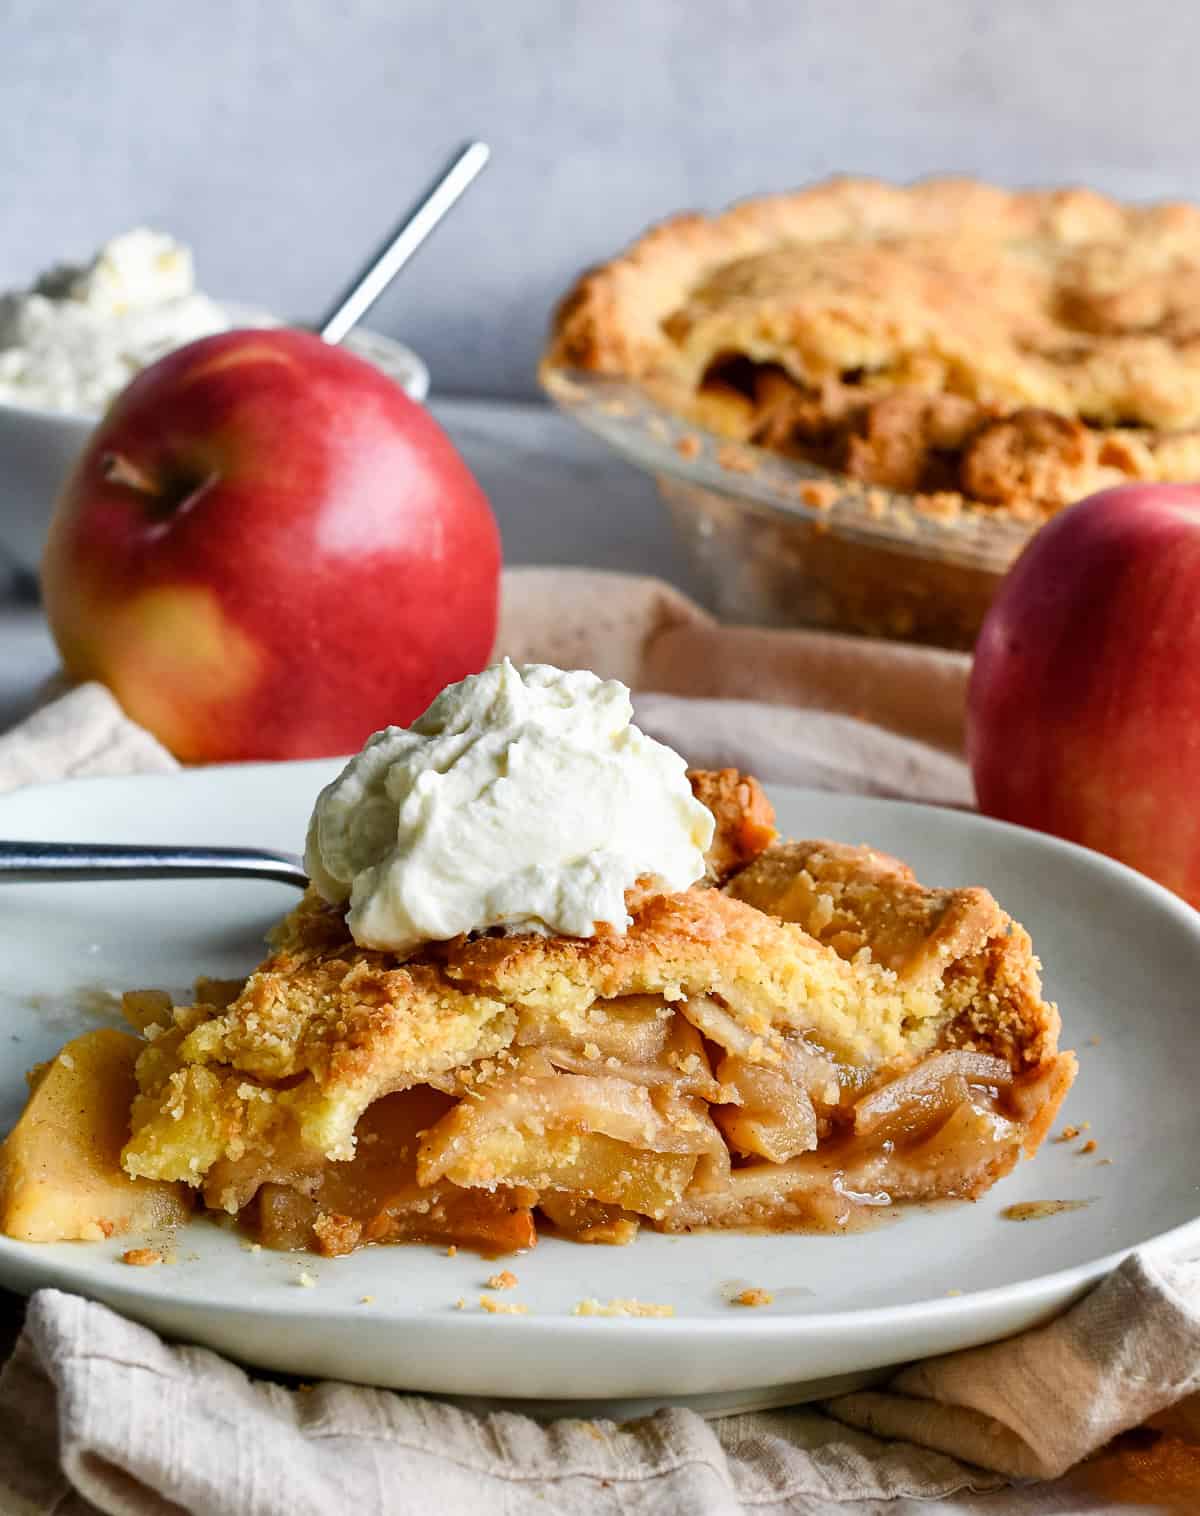
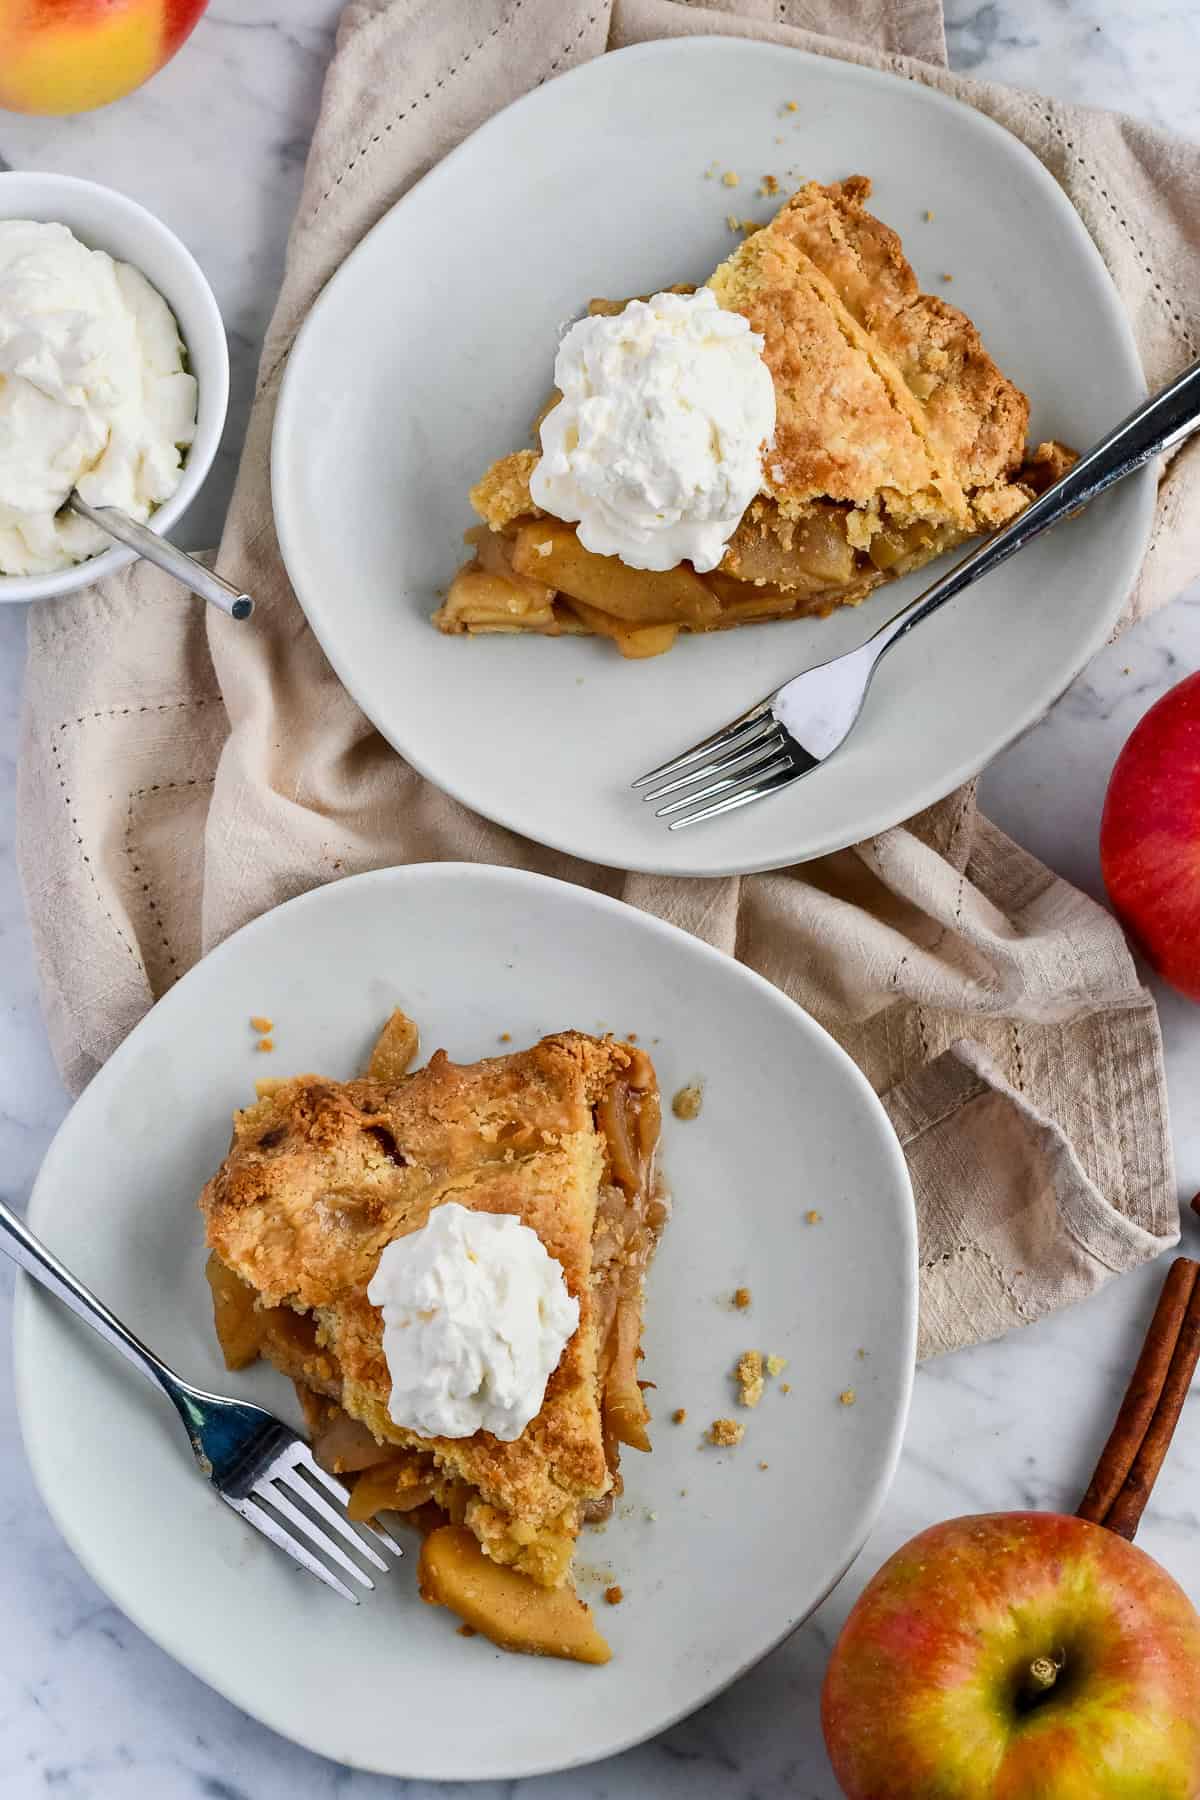
Once the pie is baked and cooled, finishing it with a scoop of whipped cream or vanilla ice cream is the ultimate treat.
Why You’ll Love This Apple Pie
- Flaky, buttery crust that tastes just like the traditional version but without gluten or grains.
- Deliciously sweet cinnamon apple filling using only maple sugar or coconut sugar.
- Comforting homemade flavor perfect for the holidays.
- Completely gluten-free, paleo-friendly, and refined sugar free with a dairy free option.
- Easy-to-follow steps that make grain-free crust success achievable every time.
- Classic family-favorite that everyone will love—no one will guess it’s a healthier version.
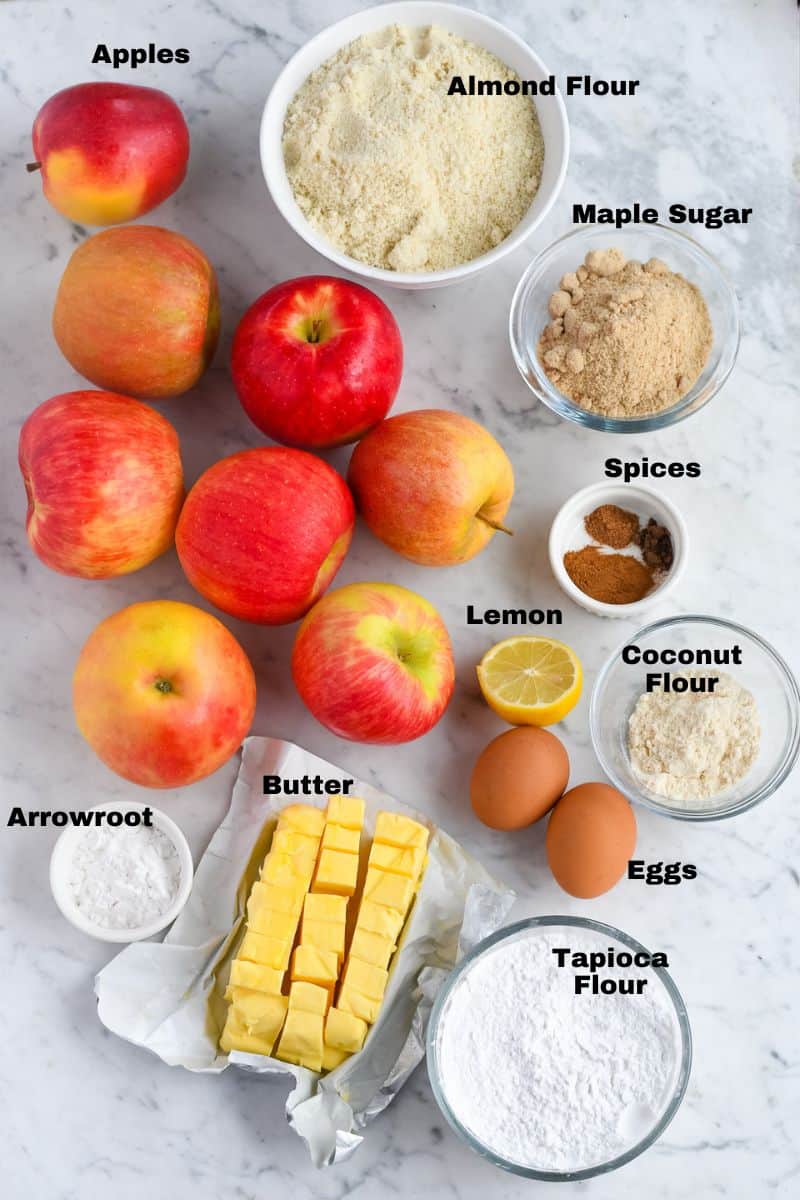
Ingredients and Substitutions for Paleo Apple Pie
Flaky Pie Crust
This gluten free pie crust is made with 3 types of flour to create an incredibly flaky crust. Each ingredient has a very specific job. I use butter but it can be made with palm shortening for dairy free.
- Almond flour is the main nut flour providing most of the bulk.
- Tapioca flour provides the light, airy, fluffiness.
- Coconut flour gives structure to the cake.
- Maple sugar, just a little, improves its flavor and enhances browning. I like maple sugar because it keeps the color light. You can substitute coconut sugar which is easier to find but the crust will be a little darker.
- Cold unsalted butter gives the crust a rich, creamy, slightly sweet flavor and flaky texture. Use a high quality pasture raised unsalted butter. For dairy free use palm shortening. It’s just as tender and flaky as the butter crust, but a slightly different taste.
- Pastured eggs bind the dough together, making it more elastic, easier to roll out, and less likely to crack. This is key in a gluten free crust.
- Sea salt gives the crust more flavor.
Apple Filling
- Apples – Choose a variety of apples for the best taste. Choose half tart apples like Granny Smith, Pink Lady, Braeburn or McIntosh. The other half sweet apples like Fuji, Honeycrisp, or Gala. It’s the same when making Apple Crisp.
- Maple Sugar – Sweetens the pie filling naturally. Coconut sugar can be substituted but will be darker. Maple syrup or honey will also work but will have a different taste. If using a liquid sweetener add another 1/2 tablespoon of arrowroot. For sugar free use allulose.
- Lemon – Helps keep the flavor bright and prevents the apples from browning. You won’t taste it but it is important.
- Spices – Cinnamon gives the filling a warm sweet flavor. Nutmeg and allspice gives the filling a more interesting flavor but they are optional.
- Arrowroot – Thickens the filling, tapioca can be substituted.
How To Make The Best Paleo Apple Pie with Photos
Make the Crust
The dough needs to chill for at least 45 minutes so plan ahead. It can be made the day before. Make sure your butter or shortening is cold and your eggs are at room temperature. I make it in a food processor which is easy, but I include directions to make it with forks.
Mix the dry ingredients together: Sift almond flour, coconut flour, tapioca flour together into a food processor or bowl. This gets rid of any lumps. Add the maple sugar and salt.
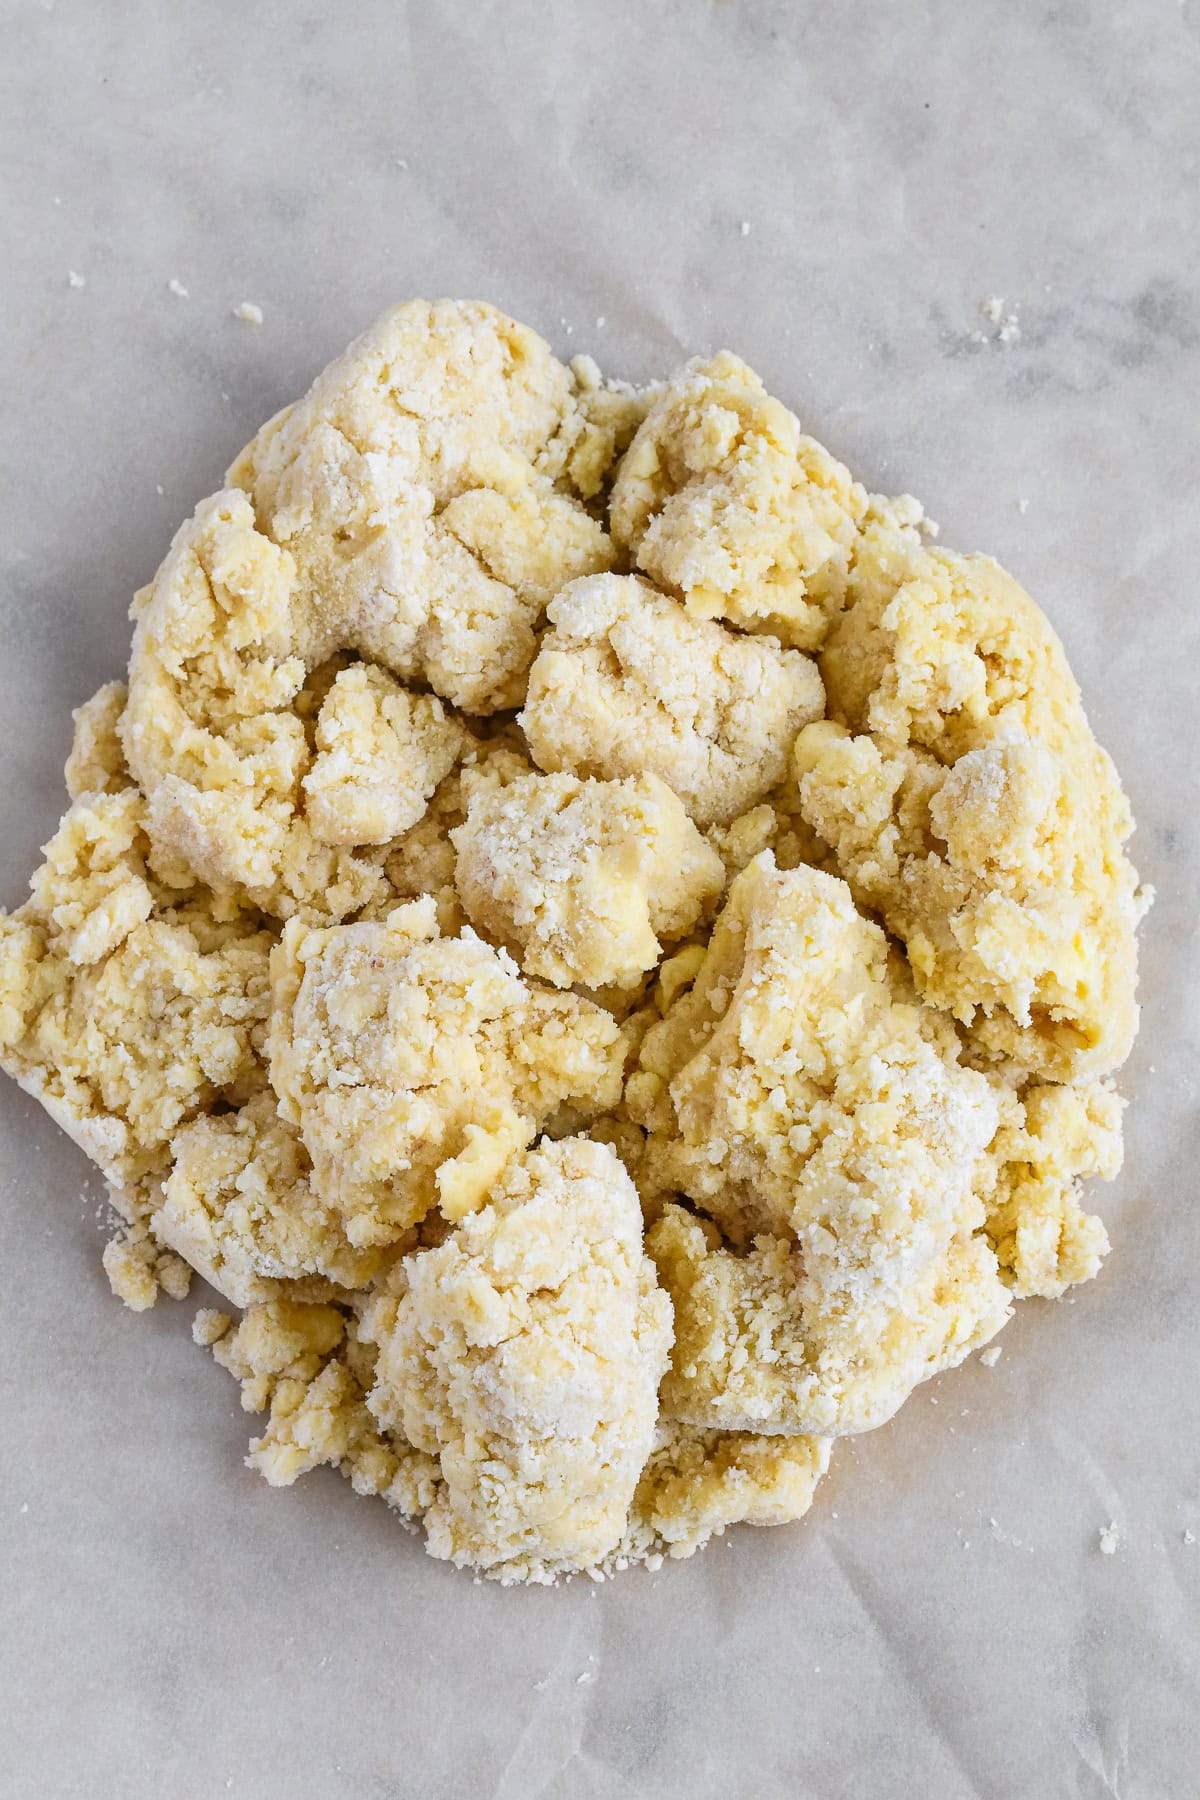
Cut in the butter. Add the butter. If using a processor pulse, 10-15 pulses, until it resembles coarse meal. Alternately use a pastry cutter, or two forks. Cut the butter into the dry ingredients until it resembles coarse meal. You’re looking for pea-sized bits of flour-coated butter. A few larger bits of butter is OK. In this step, you’re only breaking up the cold fat into tiny little flour-coated pieces; you’re not completely incorporating it. Do not overwork the ingredients.

Add the egg and pulse or mix just until the dough begins to form, 10-15 pulses, there may be stray crumbs, that’s ok.

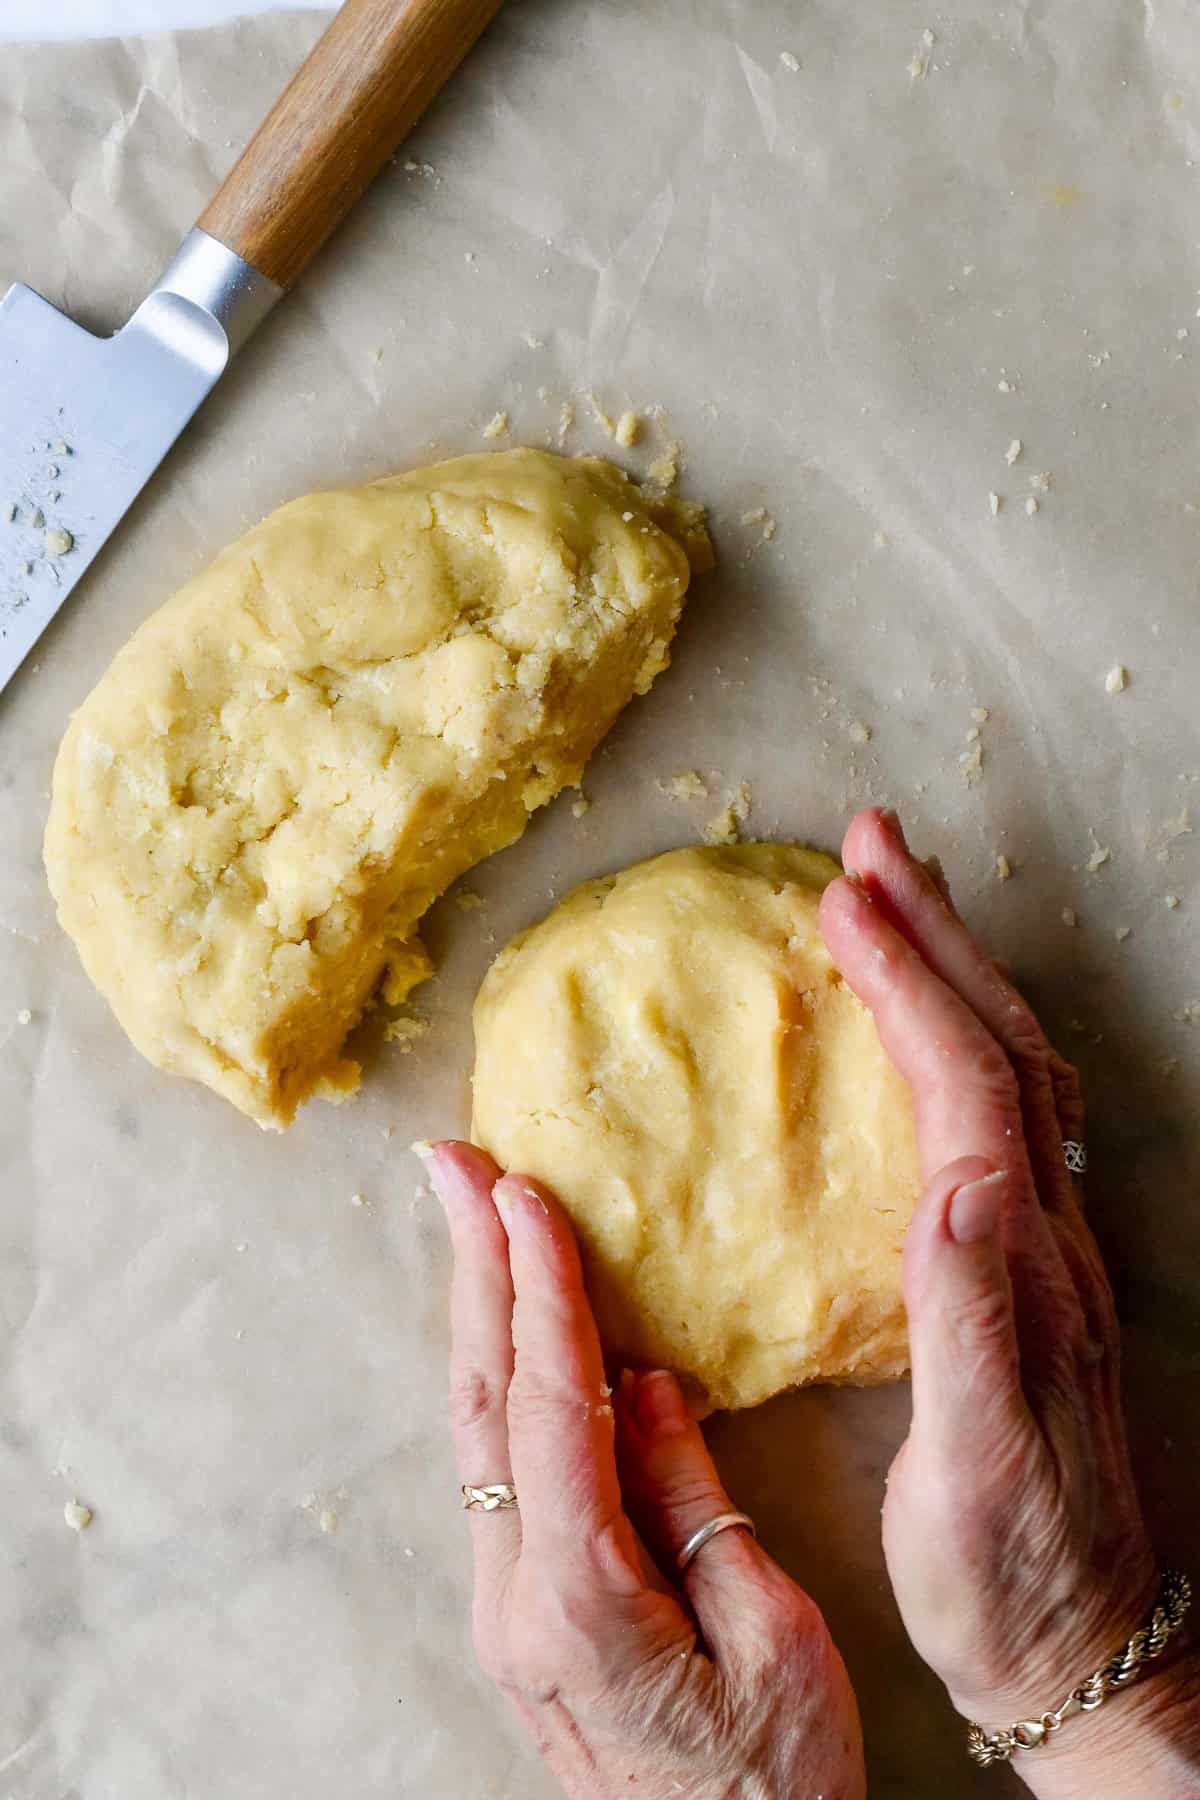
Transfer the dough to a piece of parchment lightly floured with tapioca flour. Using your hands, gently bring the dough mixture together into a ball. Avoid overworking the dough.

Divide the dough in half using a sharp knife. Using your hands, gently flatten each half into a 1-inch-thick disc. Wrap separately in plastic, then chill for at least 45 minutes. You can make the dough up to 5 days in advance.

Make The Filling
Mix the apples: In a large bowl, stir the apple slices, sugar, flour, lemon juice, cinnamon, allspice, and nutmeg together until thoroughly combined.
Optional pre-cook: Pour the apple filling into a large skillet. Cook over medium heat, stirring gently, until the apples begin to soften, about 5 minutes. This step is optional, but I’ve found it makes for a juicier, more flavorful filling because it helps begin to soften the apples. Remove from heat and set aside to slightly cool while you roll out the bottom crust.

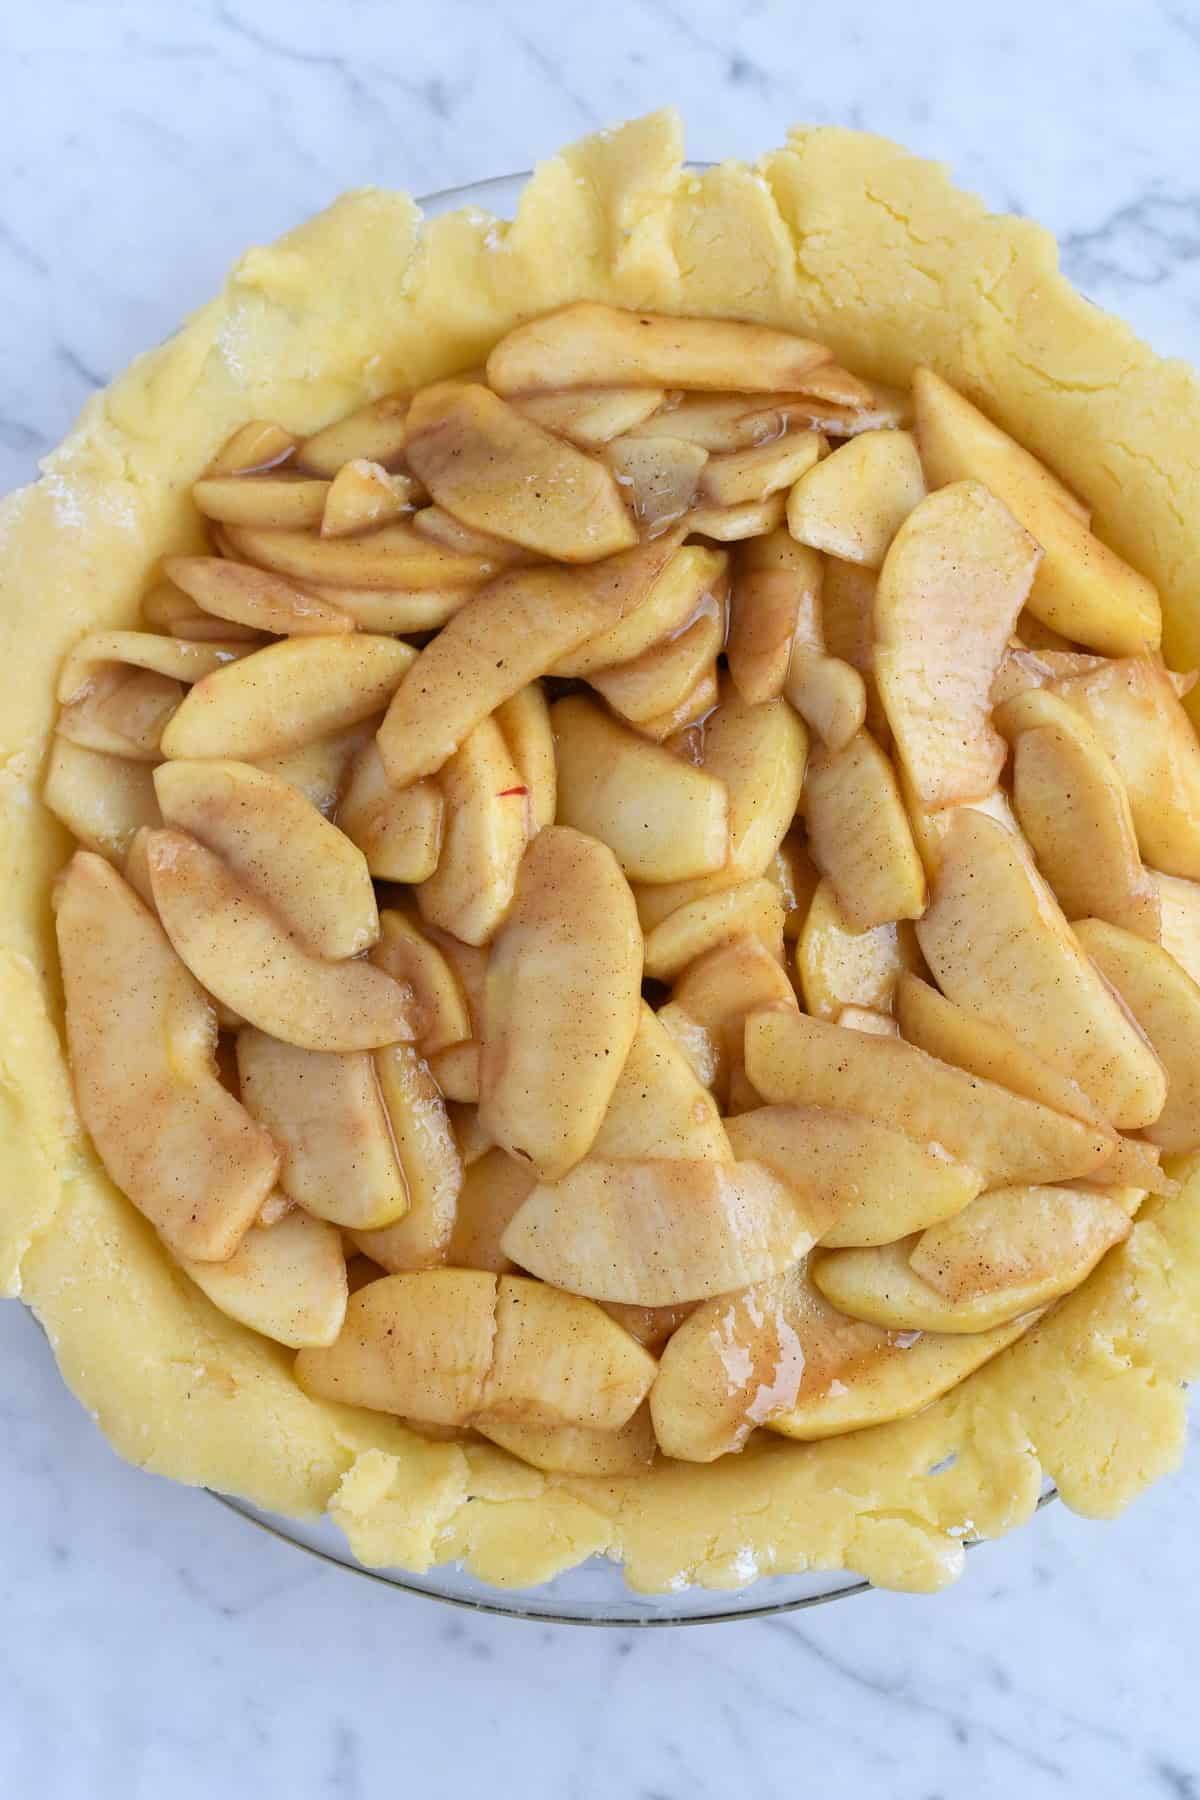
Roll out the bottom crust: Preheat your oven to 425° F. Roll out one of the discs of chilled dough on a sheet of parchment paper, dusted with tapioca flour. Keep rolling until you have a circle 12 inches in diameter. (See tips below.)

Transfer to pie dish. Place your pie dish upside-down over the dough, then using the bottom parchment paper, flip the dough into the dish. Tuck the dough in with your fingers, making sure it is smooth. This dough can break easily since it lacks gluten, however it also repairs incredibly easily and can withstand a lot of manipulation without affecting the final product!

Roll out the top crust into another 11-12” circle.
Spoon the filling into the crust. It’s ok if it is still warm from the precooking step. It will seem like a lot of apples; that’s ok. Pile them tightly together.
Carefully place top crust over filling.
Crimp the edges with your fingers or seal with a fork. OPTIONAL brush with milk and sprinkle with maple sugar. The milk and sugar help the crust brown nicely

Bake the pie on the middle oven rack for 25 minutes. After 25 minutes reduce the oven temperature to 375°F. Add a pie crust shield (see this video for a homemade shield) to prevent the edges from over-browning.
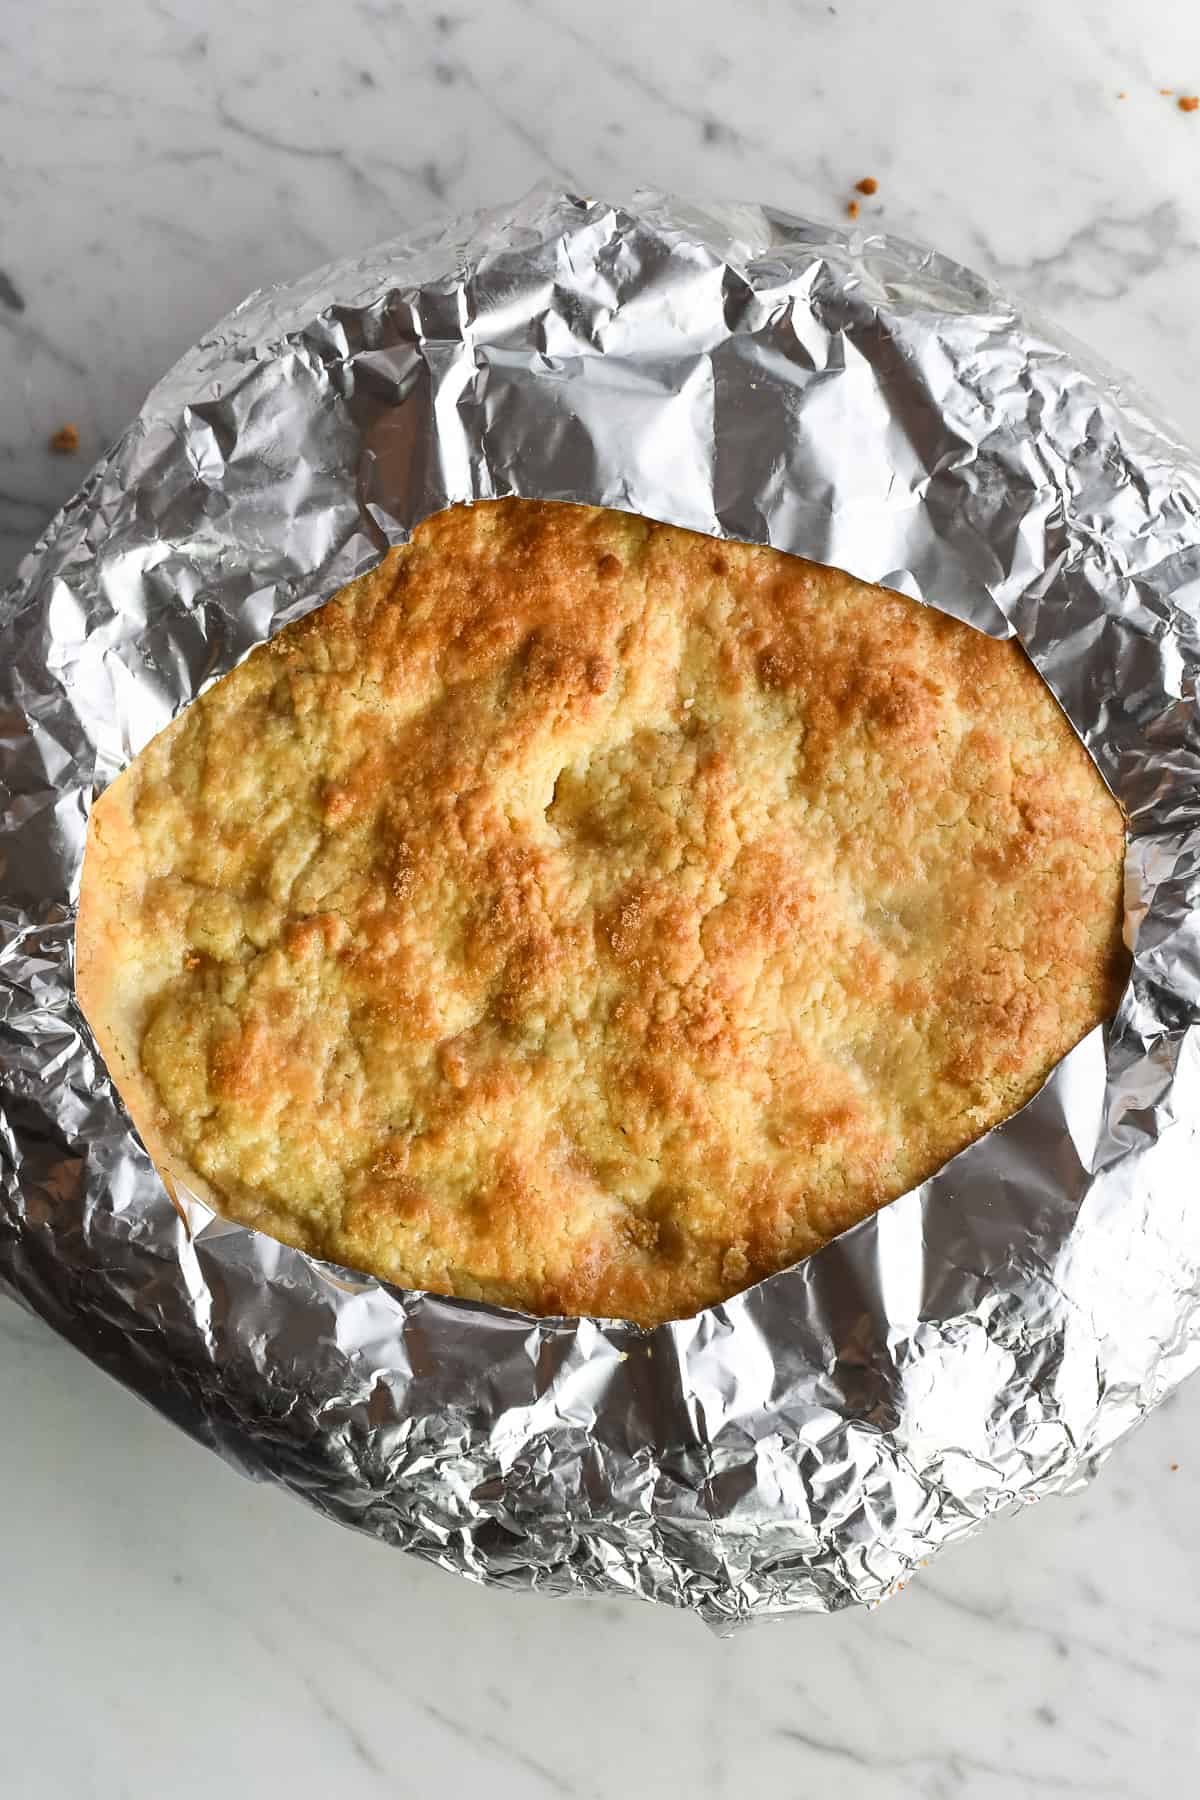
Continue baking until the pie is golden brown, and filling is bubbly 35-45 more minutes. If the pie is getting too brown towards the end of the bake time, tent an entire piece of foil on top of the pie. Note: If you want to be precise, the internal temperature of the filling taken with an instant-read thermometer should be around 190°F when done.
Tips
- Use a 9″ wide, deep dish pie pan. Glass is best.
- Make sure your butter or shortening is very cold and eggs are at room temperature.
- Don’t overwork the dough when you’re cutting in the butter or after you add the eggs. Overworking it makes the dough tough.
- When rolling out the chilled pie dough discs, use gentle force with your rolling pin. Start from the center of the disc and work your way out in all directions, turning the dough with your hands between rolls. Smooth out the edges if you notice cracks. Keeping your work surface, rolling pin, and hands lightly floured makes rolling out easier.
- If your crust rips or tears when you roll it out you can just patch it together.
- Make sure your apple slices are uniform in size about 1/4″ thick. This way they cook evenly.

Serving and Storing
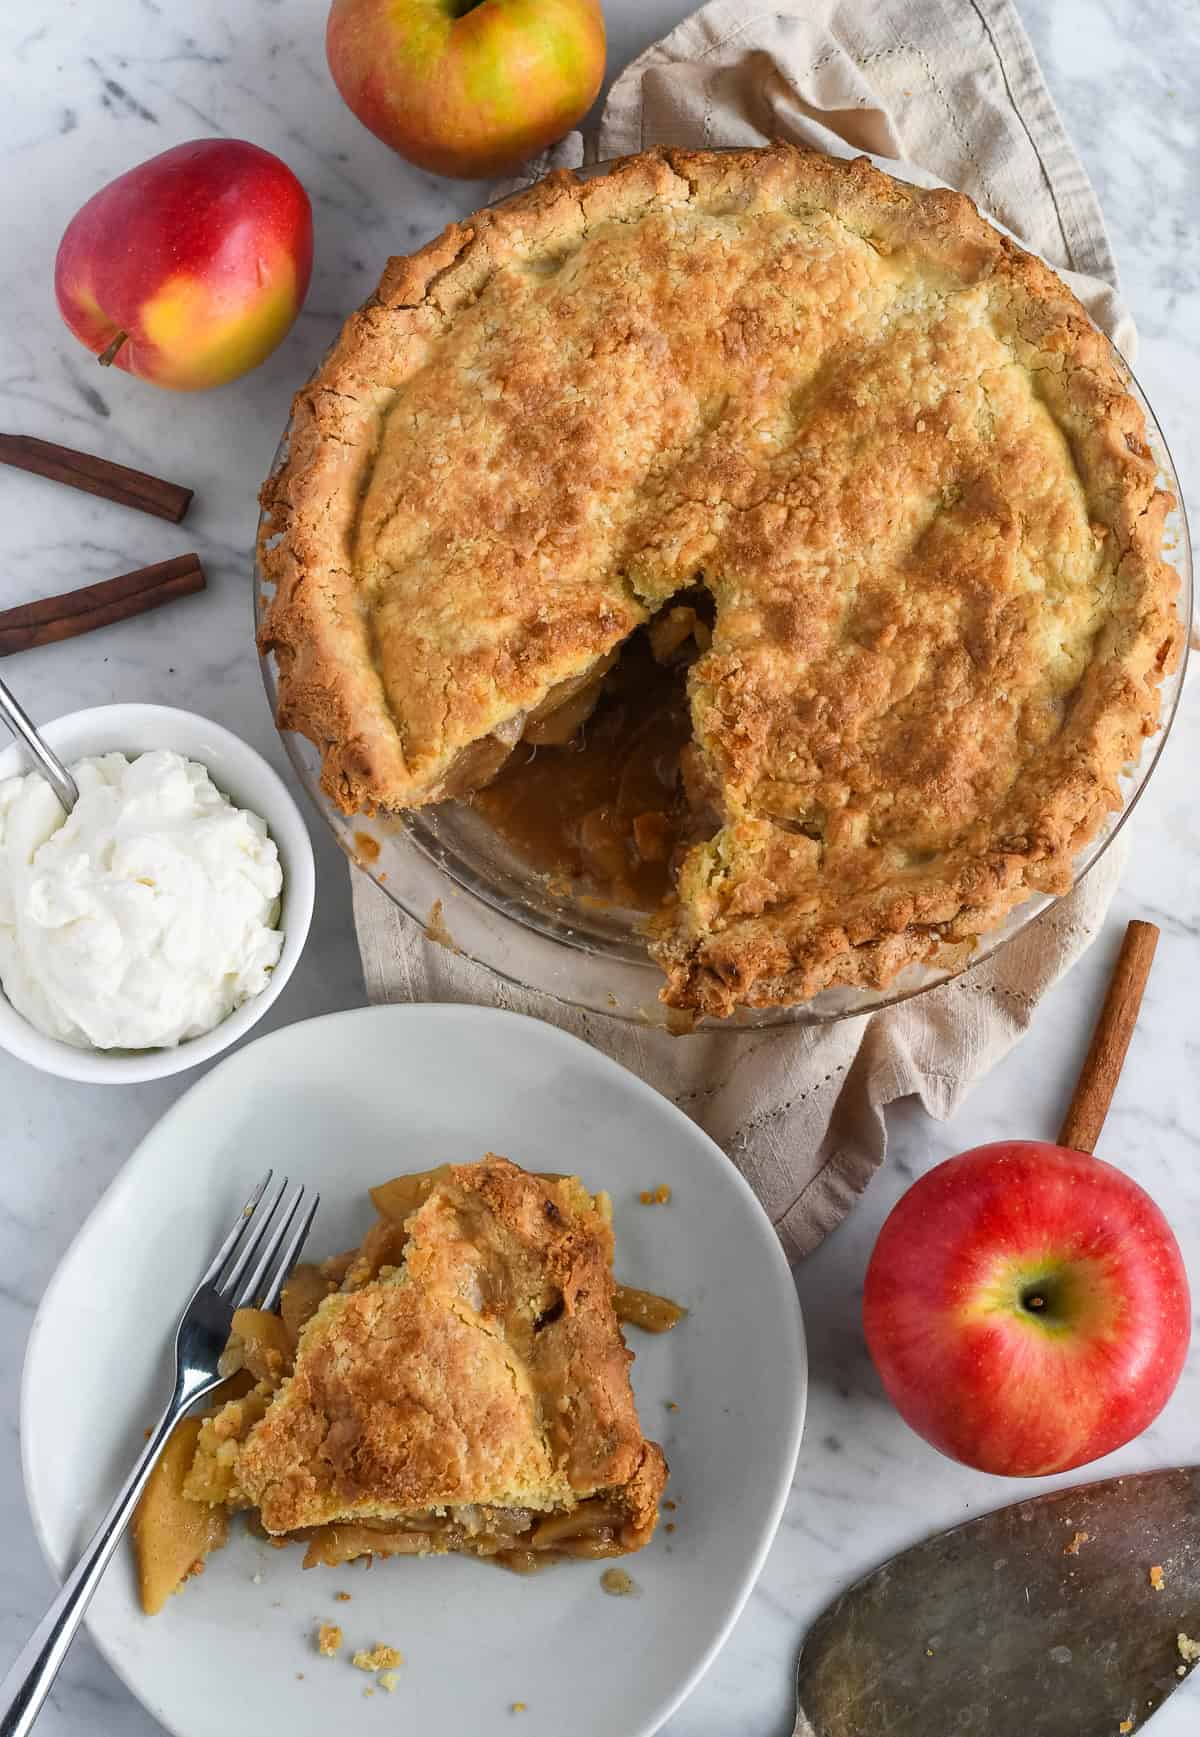
Cool the pie: I recommend cooling for at least 2 hours before slicing and serving. It will set up and cut much better. I know it’s hard to wait! You can allow it to sit out at room temperature, loosely covered overnight.
The apple pie is best served within 24 hours of baking. If keeping longer cover and refrigerate until ready to serve, then gently warm in the oven.
Serve alone or topped with whipped cream or ice cream.
More Classic Pies and No Fuss Bars and Cobblers
Here are some more paleo, gluten free pies but if you want to make something easier check out the recipes for the bars and cobblers. You don’t have to roll any crust for them.
- Paleo Pumpkin Pie
- Key Lime Pie (Dairy Free)
- Cookie Crumb Apple Bars
- Pumpkin Pie Bars with Almond Cookie Crust
- Fresh Lemon Bars (Nut Free)
- Paleo Apple Crisp
- Cranberry Apple Cobbler (Vegan)
- Pear Raspberry Cobbler
Enter your email to receive this recipe, along with weekly recipes and inspiration.
Flaky Paleo Apple Pie Gluten Free & Irresistible

Sweet cinnamon-scented apples are tucked beneath a buttery, tender, flaky crust. It’s everything you love about traditional apple pie, but gluten free and refined sugar free.
- Prep Time: 2 hours (includes the pie crust)
- Cook Time: 1 hour 5 minutes
- Total Time: 6 hours includes time to cool
- Yield: 8-10 servings
- Category: Dessert, Snack
- Method: Bake
- Cuisine: Paleo, Gluten Free, Vegetarian
Ingredients
Flaky Crust
- 2 cups blanched almond flour (224 grams)
- 2 Tablespoons coconut flour (14 grams)
- 1 1/3 cup tapioca flour (160 grams)
- 1 teaspoon sea salt
- 2 Tablespoons maple sugar or coconut sugar (22 grams)
- 1 cup unsalted butter, 8 ounces, 227 grams chilled and cubed (palm oil shortening can be used for dairy free)
- 2 large pastured eggs, at room temperature, beaten
Apple Filling
- 10 cups apples, peeled, cored and thinly sliced into ¼” slices
- 1/2 cup maple sugar or coconut sugar
- 2 Tablespoons arrowroot
- 1 Tablespoon lemon juice
- 1 1/2 teaspoons ground cinnamon
- 1/4 teaspoon ground allspice (optional)
- 1/4 teaspoon ground nutmeg (optional)
- 2 Tablespoons milk or nut milk for brushing the top (optional)
- 2 Tablespoons maple sugar or coconut sugar for sprinkling on top (optional)
Instructions
Prepare the Crust
- Chill your butter or shortening. If you’re using butter it’s probably already in the refrigerator.
- Take eggs out of the refrigerator and let come to room temperature.
- Mix the dry ingredients together: Sift almond flour, coconut flour, tapioca flour together into a food processor or bowl. This gets rid of any lumps. Add the maple sugar and salt.
- Cut in the butter. Add the butter or shortening and pulse, 10-15 pulses. until it resembles coarse meal (see photos above). Alternately use a pastry cutter, or two forks, cut the butter into the dry ingredients until it resembles coarse meal. You’re looking for pea-sized bits of flour-coated butter. A few larger bits of butter is OK. In this step, you’re only breaking up the cold fat into tiny little flour-coated pieces; you’re not completely incorporating it. Do not overwork the ingredients.
- Add the egg and pulse or mix just until the dough begins to form, 10-15 pulses, there may be stray crumbs, that’s ok.
- Transfer the dough to a piece of parchment lightly floured with tapioca flour. Using your hands, gently bring the dough mixture together into a ball. Avoid overworking the dough. If it feels too dry or is too crumbly to form a ball, dip your fingers in cold water and then continue bringing the dough together. If it feels too sticky, sprinkle on a little more tapioca flour and continue bringing it together. Gather the dough into a ball.
- Divide the dough in half using a sharp knife. Using your hands gently flatten each half into a 1-inch-thick disc. Wrap separately in plastic, then chill for at least 45 minutes. You can make the dough up to 5 days in advance.
Make The Filling
- Mix the apples: In a large bowl, stir the apple slices, sugar, flour, lemon juice, cinnamon, allspice, and nutmeg together until thoroughly combined.
- Optional pre-cook: Pour the apple filling into a large skillet. Cook over medium heat, stirring gently, until the apples begin to soften, about 5 minutes. This step is optional, but I’ve found it makes for a juicier, more flavorful filling because it helps begin to soften the apples. If you can, take the few extra minutes to do this.
- Remove from heat and set aside to slightly cool while you roll out the bottom crust.
- Roll out the bottom crust: Preheat your oven to 425° F and have a 9” glass pie dish ready. Roll out one of the discs of chilled dough on a sheet of parchment paper, dusted with tapioca flour (see tips above). Keep rolling until you have a circle 12 inches in diameter.
-
Roll out the top crust into another 11-12” circle.
-
Spoon the filling into the crust. It’s OK if it’s still warm from the precooking step. It will seem like a lot of apples; that’s OK. Pile them tightly together.
- Crimp the edges with your fingers or seal the edges with a fork. OPTIONAL, brush with milk and sprinkle with maple sugar. The milk and sugar help the crust brown nicely
- Bake the pie on the middle oven rack for 25 minutes. After 25 minutes reduce the oven temperature to 375°F (190°C). Add a pie crust shield(see this video for a homemade shield) to prevent the edges from over-browning.
- Continue baking until the pie is golden brown, and filling is bubbly, 35-45 more minutes. If the pie is getting too brown towards the end of bake time, tent an entire piece of foil on top of the pie. Note: If you want to be precise, the internal temperature of the filling taken with an instant-read thermometer should be around 190°F when done.
- Allow the pie to cool at least 45 mins before serving. You can allow the pie to sit out at room temp, loosely covered, overnight if necessary.
- The pie is best served within 24 hours of baking. If keeping longer cover and refrigerate until ready to serve, then gently warm in the oven.


The post Flaky Paleo Apple Pie (Gluten Free) appeared first on Eat Well Enjoy Life – Pure Food, Radiant Energy (gluten free).